V1 Seamless Sign On Integration Steps (Deprecated)
Introduction
This document describes how you can integrate Hio Hovr into your website with optional easy sign on setup for your customer.
Prerequisites
The technical changes needed on your website/webapp are minimal but requires a web developer/engineer who can make changes to the backend and frontend of your website. This requires a moderate level of technical knowledge of your platform unlike the standard Hio Hovr setup that requires very basic understanding of your website and can be done by a non-technical person in most cases.
Before you can implement the easy sign-on integration for your Hio Hovr integration, you need to request an integration token from your Hio Account manager. This token will be delivered to your development team in a secure manner.
Hovr must be set up as Seamless sign on
A hovr can be created one of two ways (list below). The hovr that you are trying to use Seamless Sign On with must be expecting the JWT token being sent so must be configured accordingly. Please look at below options for your use case.
- Through our admin dashboard - Reach out to your account manager. They will enabled Seamless Sign On on your behalf.
- Through dynamic site creation - Ensure that the site created has the isSingleSignOn boolean flag to true
Client Steps
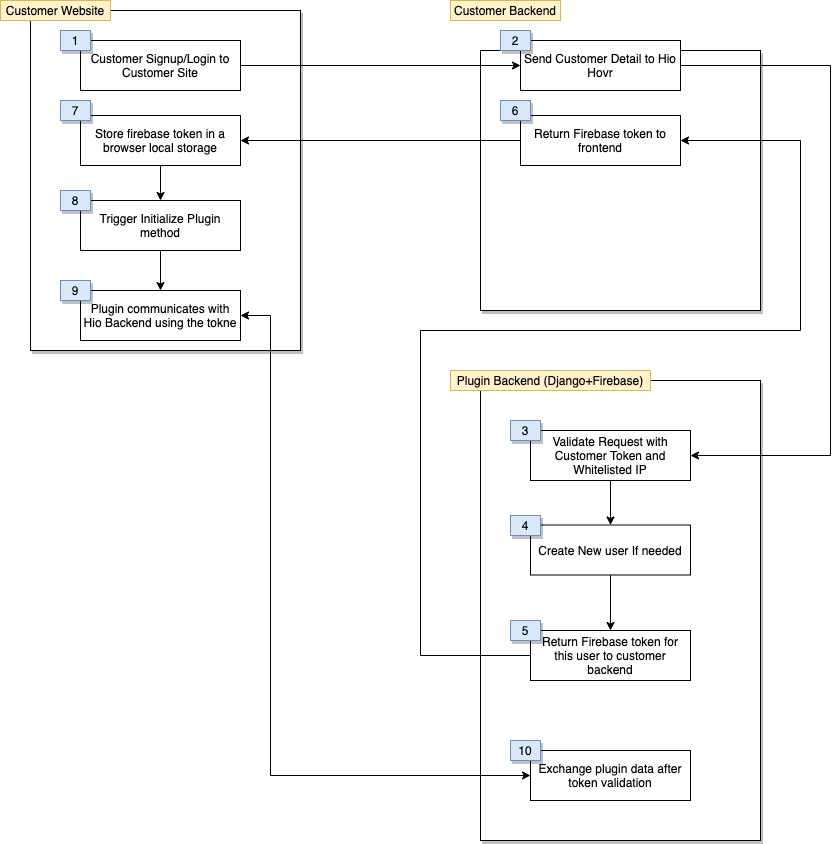
- After user Authenticates in your system add in the API callout to HIO using information below. This callout should occur in a backend method for extra security.
- Consume the JSON response.
- Store the custom token returned to you on the local storage.
| Key | Value |
|---|---|
| hovr_j_f_s | JWT Token |

End Points
Production Environment:
https://prod-gcf.hiosocial.com/integration/user/authorize
Usage
Method:
POST
Header
| Field | Description | Required |
|---|---|---|
| Authorization | Integration Token(from HIO) | Yes |
| Content-Type | application/json | Yes |
Body(JSON)
| Field | Description | Required |
|---|---|---|
| first_name | String first name | Yes |
| last_name | String last name | Yes |
| Yes | ||
| phone_number | country code plus phone number | No |
| user_metadata | Structure described below | No |
user_metadata
| Field | Description | Required |
|---|---|---|
| bio | String | No |
| String either full url or just the username | No | |
| profile_image | String that is a url of the profile image | No |
| interests | Array(Detail coming Soon) | No |
{
  "first_name": "Awesome",
  "last_name": "McAwesome"
  "email": "[email protected]",
  "phone_number": "+13334445555",
  "user_metadata:
  {
  	"bio": "This is my awesome Bio",
    "linkedIn: "https://www.linkedin.com/in/ThunderCats",
    "profile_image": "https://photos.google.com",
    "interests": []
	}
}
Responses
200 : JWT Access Token
{
  "Access-Token": "<JWT Token>",
  "email_used": "[email protected]"
}
400: Bad Request
{
	"status": "failed",
	"message": "Please provide required user details."
}
401: Unauthorized Server
{
	"status": "failed",
	"message": "Authorization error."
}
401: Unauthorized Server
{
	"status": "failed",
	"message": "Invalid integration token."
}
500: Internal Server Error
{
	"status": "failed",
	"message": "Error Message"
}
Visual Flow

Updated over 4 years ago